User Manual
Copyright © 2018 EarlyWorks Education Pty Ltd (A.C.N. 603 607 281). All rights reserved.
Copyright © 2018 EarlyWorks Education Pty Ltd (A.C.N. 603 607 281). All rights reserved.
Screen Navigation, Naming Conventions, and Terminology
Log in to Your EarlyWorks Account
Experiences Awaiting Evaluation
Add an Experience to the Program from an Observation
Manually Add an Experience to the Program
Link an Observation to a Next Experience
Multiple Rooms can Create a Single Program (assists with primary caregiving)
Menu Upload option for Daily Communications.
Individual Child Planning Cycle
Planning for the Individual Child
Use Learning Journey Comments to Inform the Program
Individual Child Analysis Chart
Child Profiles – Planned and Observed Outcomes
Generate the Planning Cycle Report
Add Planned Experiences to the Event Calendar
Add and Manage Images/Documents for a Room
Add Documents and Images to a Child
Add QIP Strengths and Improvements
Set the Home Page for Families
EarlyWorks uses colour-coded Set the Frequency of Child Alerts
Allow All Families to View Photo Journal Images
Show Only Children by Attendance when Selecting Children for Related Images and Documents
Use Upload Date as the Default Image Name
Show Reflection of Learning, Next Experience, and Children’s Voices in Journal Output
Change the Name of the Learning Framework Options
Change the Default Framework for the Service
Change the Label for Program and/or Experience
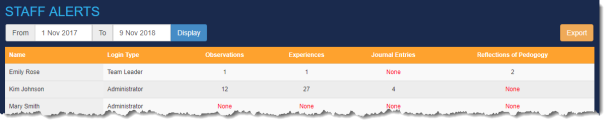
View Individual Educator’s Observations, Experiences, Journal Entries, and Reflections of Pedagogy.
Experiences Awaiting Evaluation
How to provide continuing access to families of children leaving your service.
Add Outcomes to an Outcome Group
Create a Quality Improvement Plan
Generate the Quality Improvement Plan
This Manual has four parts:
This section describes some of the common elements of the EarlyWorks application, and the terms used to describe them in this Manual. We recommend that you familiarise yourself with this section before starting.
We use the term ‘click’ for any action you have to do to select an item on the screen:
We use the term ‘enter’ to refer to text that you type, using whatever methods suit your device, including speech-to-text.
|
Hints & Tips |
Many textboxes in EarlyWorks can accept speech-to-text. Talking into your device to make an observation etc. can save you a lot of time, and means you don’t have to focus on a keyboard while dealing with the other tasks you need to attend to. Check your device to see if it accepts speech and converts it to text—most phones and tablets do, though it may be something you need to turn on in the device’s settings. And then learn how to use this function—it may save you a lot of time. |
You use the menu to navigate through the various EarlyWorks screens. In this Manual, we refer to menu items as Menu Option > Sub-item (e.g. Admin > Dashboard).
On large-screen devices, the menu is shown across the top of the browser window.

On small-screen devices, such as tablets or smartphones, you access the top-level menu items by clicking on the 3-bar icon at the far right of the window.
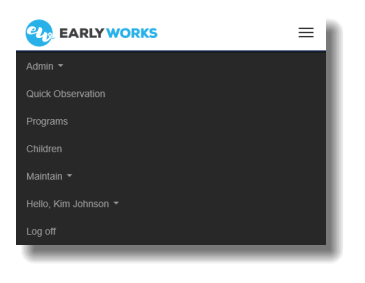
Some menu options contain sub-items—these are indicated by a small triangle to the right of the text. Clicking menu options with a triangle displays the list of related sub-items.
The last menu option is Log off. We recommend that you log out of EarlyWorks if you plan to leave your device unattended for any length of time, especially if your device is shared with other users or is located in a shared space.
You will visit various screens as you use EarlyWorks. A ‘breadcrumb trail’ of the screens that you accessed before the current screen is shown below the menu. You can click any blue link to return to that screen.

Some screens contain multiple sections, grouped by related information (tabs). Only one tab is visible at a time. To access the various sections, click the blue text on relevant tab at the top of the screen.

Most screens in EarlyWorks display help text for the current screen, below the breadcrumb trail.

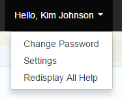
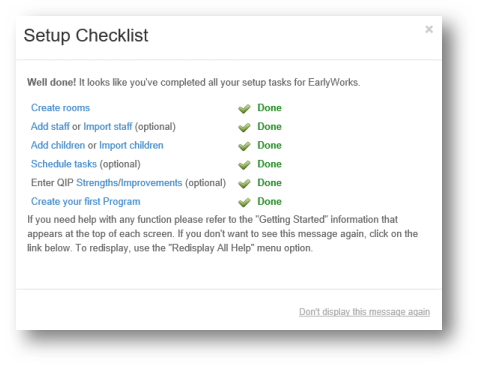
You can hide this text temporarily by clicking the small cross (×) in the top right of the help text box. Once you are familiar with the screen, you may not need this information—click Don’t display this message again to hide the help. Note: You can always redisplay this help by clicking Hello, <your name> > Redisplay All Help.
Some fields are NOT optional—you must add information to them. A red asterisk (*) next to the field’s label indicates a mandatory field.
Most buttons are represented in this Guide as Button, Button, or Button. Click a button to perform the action listed on the button.
You enter text in a textbox. Note: If your device supports speech-to-text, you can talk to enter the text in some textboxes.
A dropdown list contains a predefined list of items. Click the arrow to select an item from that list.
Checkboxes are either checked (ticked, crossed) or unchecked (unticked, blank). Click the checkbox to change from ticked to unticked, or vice versa.
This Manual uses these words:
The Glossary at the end of this Manual defines many of the terms used in this document.
Note: You must be connected to the internet to use EarlyWorks.
Passwords:
For example, AbR4caDa$R4 (11 characters, using characters from each character group) is a valid password, whereas AbracaDabra (11 characters, but only using characters from two character groups) is not valid.
A password for each EarlyWorks user (including families) is automatically generated and emailed to them when their user details are added to EarlyWorks. At their first-ever login, they are asked to change their password. If they later forget their password, they can click ‘forgot password’ on the login screen to be automatically issued with a new password. Alternatively, administrators can email them a new, auto-generated password, or generate new passwords for multiple users (see Send a New Password and Issue Bulk Passwords). After a new password is generated and sent, the user is asked to change it on their next login.
EarlyWorks App users can now receive push notifications for new observations, journal entries, comments, daily communications, quick notifications and documents. The EarlyWorks App is available from the Apple AppStore and Google Play.
There are several ways you can find a record:
In some screens, you can sort the listed records by clicking the text in a column heading. The first click sorts the records in ascending order; click again to sort in descending order. Each subsequent click reverses the previous order. An arrow to the right of the column heading shows the direction of the current sort order (pointing up for ascending, down for descending).

To edit a record on a list screen, click anywhere in its row (but not a button, checkbox, trash can [rubbish bin] icon, or link).
Note: You can only edit records if you have permission to do so. Permission is determined by your login credentials.
To delete a record from a list screen, click the trash can icon for that row.
Note: You can only delete records if you have permission to do so. Permission is determined by your login credentials. You cannot delete records that have other records attached to them; instead, change the status of these records to ‘inactive’.
Note: You must have Microsoft Word (or a program that can read doc and docx file types) and Microsoft Excel (or a program that can read csv files) installed to save and print a document.
In various parts of the EarlyWorks system, you get the option to print a document. You may be asked to select what aspect of the system you want to print, and what report format to print to (paper size and orientation; e.g. A4 Landscape, A3 Landscape). Only choose a paper size that your printer can handle.
You can upload files (images, documents etc.) in certain areas of EarlyWorks. The file types that EarlyWorks can accept are:
The maximum size for an individual file is 8 Mb.
The Educator Dashboard gives you an overview of current activity.
Elements displayed on the dashboard:
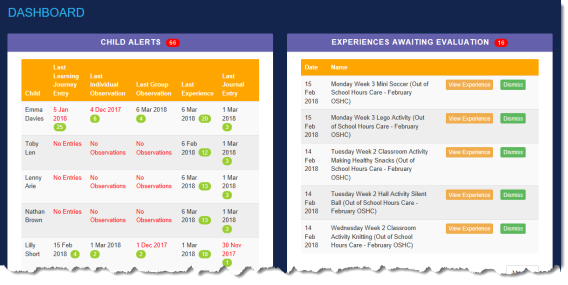
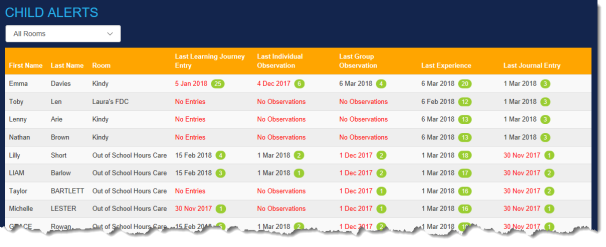
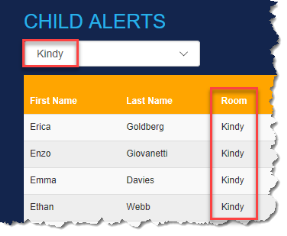
Each child’s learning and development should be documented regularly and frequently while they are with the service. On the Child Alerts screen, you can see how many learning journey entries, individual and group observations, experiences, and journal entries each child was included in, and the date the last entry was made. Dates in amber (orange) text indicate that you have reached your set warning alert; those in red text tell you that you have exceeded your maximum time since the last entry.
You can see a summary of Child Alerts on your dashboard. For more detail, use the Child Alerts screen.
The written evaluation of experiences is one way educators can show how they:
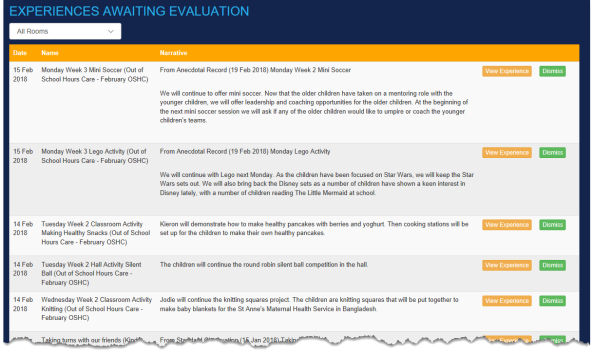
To make sure that evaluations occur regularly and frequently, educators are notified on their dashboard of any experiences for their rooms that are awaiting evaluation. Administrators can view on their dashboard a list of all experiences throughout the service that have not yet been evaluated.
You can see a summary of Experiences Awaiting Evaluation on your dashboard (to see more details of the experiences awaiting evaluation, click More…). This list is sorted by the most recent entry.

You can see a summary of Latest Child Comments (the five most recent) on your dashboard. This list is sorted by the most recent entry.
Tasks and reminders alert you to complete all compliance tasks (regular or one-off) on time.
You access your tasks from your dashboard or the Admin menu. Education Assistants can only see their tasks; Room Leaders can see theirs and other educators’ tasks; Administrators can see all tasks.
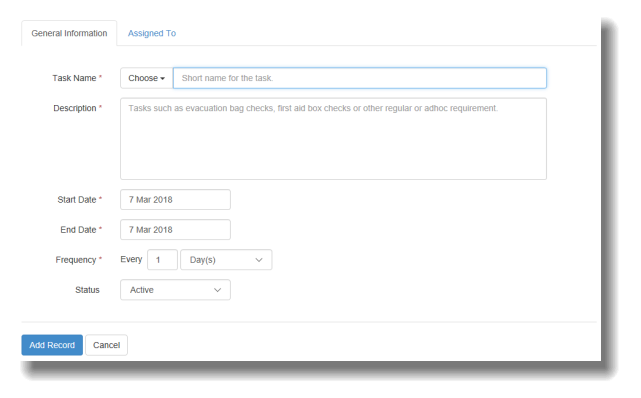
On the Tasks screen:
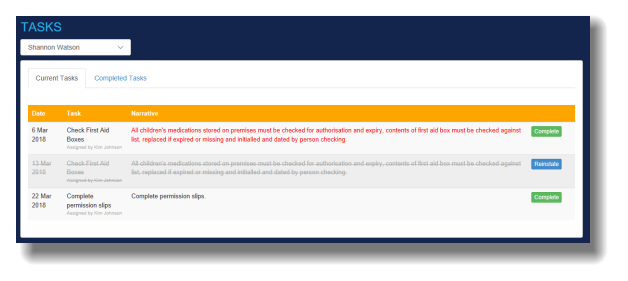
The Task Schedule List lists all scheduled tasks and reminders for room leaders and administrators. When you assign a task to a person, that task gets listed on their dashboard.
|
Hints & Tips |
|
To add or edit an event, select Maintain > Events. To add a new event, click on Add New Event Schedule. To edit an existing event, click on the row of the event you wish to edit.
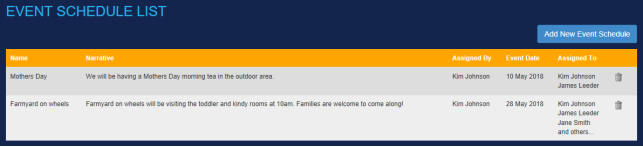
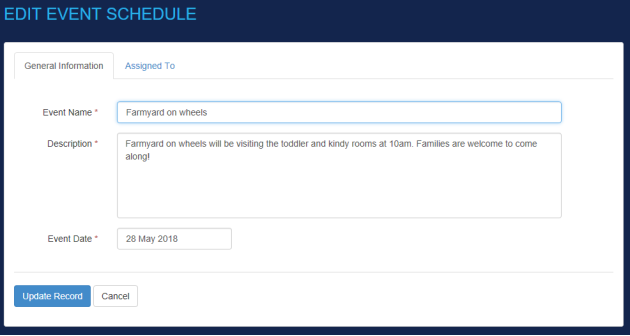
The General Information tab is where you enter a short name for the event, a brief description, and the date of the event. Click on the Assigned to tab to select whose calendars the event will appear in. You will notice that Team Leaders, Educator Assistants and Families are grouped by rooms. You can either select All or restrict your selection by clicking on individual names within each room.
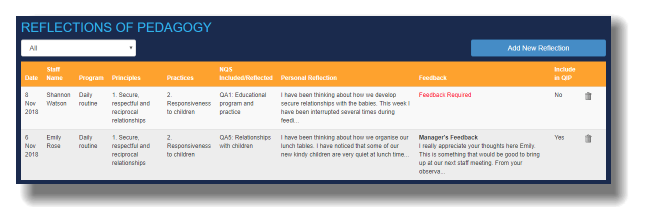
You can see a summary of Reflections of Pedagogy on your dashboard. For more detail, use the Reflections of Pedagogy screen.
|
Hints & Tips |
Regular and ongoing reflection helps services critically reflect on current practice and embed a culture of ongoing commitment to continuous improvement. The Reflections of Pedagogy within EarlyWorks provides educators with a place to reflect on their own pedagogical practices within the context of the service. Educators’ Reflections of Pedagogy are visible only to themselves and the administrators. The Queensland Government publication ‘Early years curriculum materials – Reflecting on my teaching practices’ states: ‘Research has shown how deliberate and critical reflection on teaching practices contributes to excellence in teaching, and improved educational outcomes for all children. Critically reflective teaching practices encourage teachers to:
|
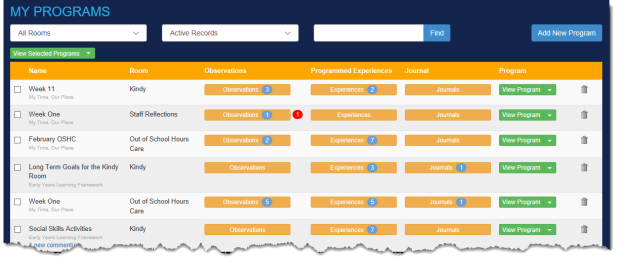
To get started on your programming and documentation, you must create at least one new program. We recommend that you always have at least two programs available so that you can move experiences to the next program if required.
Add new programs for each new program cycle (weekly, monthly, etc. depending on your service’s requirements).
Note: You cannot delete a program that is attached to an active room, or that has related observations, experiences, and journal entries associated with it. If you need to remove a program, change its status to ‘Inactive’.
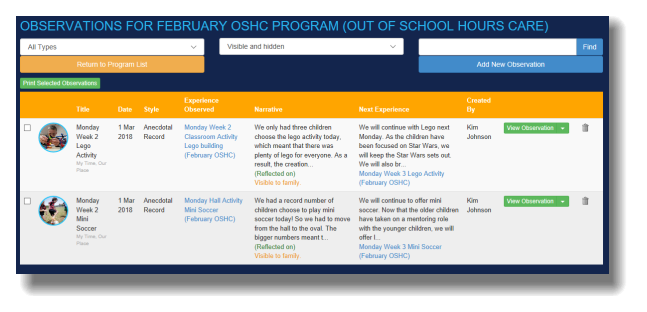
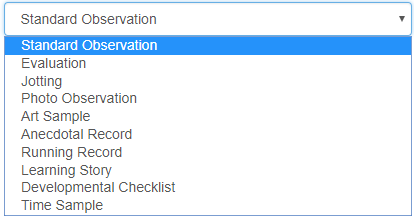
EarlyWorks creates programs, experience evaluations, child portfolios, and child learning profiles directly from observations and daily journal entries. An observation or journal entry is the written documentation of something that has occurred. Following the Observation process in EarlyWorks will help you complete a detailed, professional planning cycle each time. Creating your first observation will get you started.
, or
|
Hints & Tips |
If your observation is incomplete or requires administrator or peer review, you can set the status of the observation to Draft.
|
Note: You can skip this step if it’s a spontaneous observation.
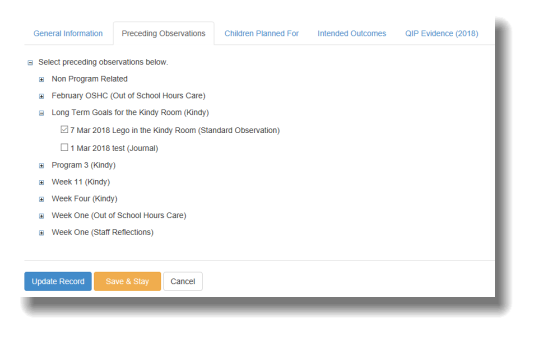
On this tab, you can select one or more experiences from the program that are being observed:
Note: Children are listed on this screen alphabetically by first name.
When you select outcomes and record comments on this tab, EarlyWorks automatically adds this information to the child’s learning profile and adds it to the child’s overall learning journey comments. This helps you provide evidence of the child’s ongoing learning and development.
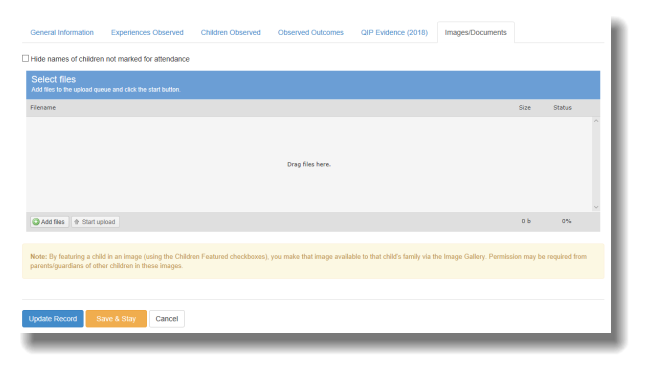
Use this tab to upload files—photos, documents, etc.—related to the observation.
If you don’t have time to complete a full observation while you are working, add a quick observation with basic details that you can complete later.
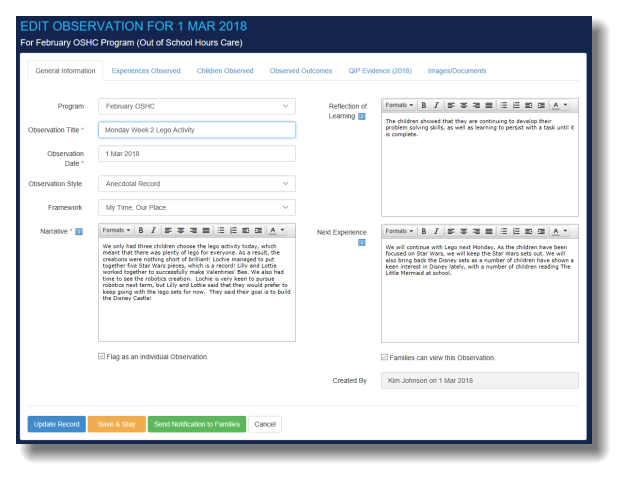
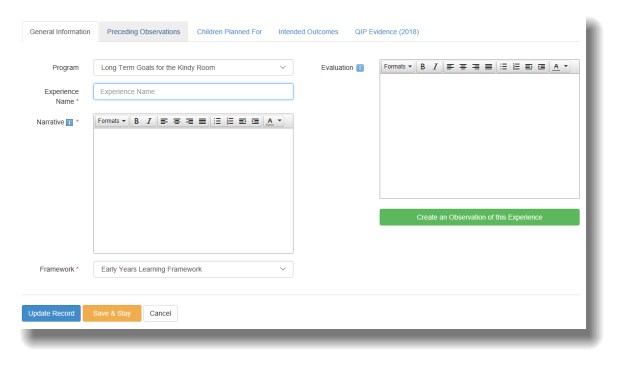
When you initially create a new observation and enter text into the Next Experience textbox on the General Information tab of the Edit Observation screen then click Update Record, the Edit Experience screen displays with that text automatically added into its Narrative textbox. You can now enter the name and intended outcomes for this next experience.
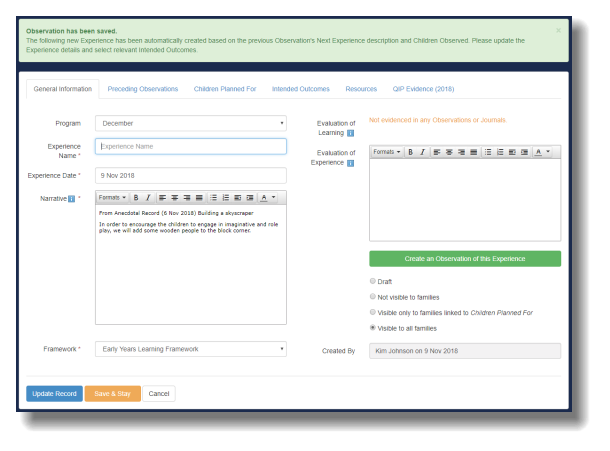
If experiences do not evolve directly from observations, indicate why you are including them in the program.
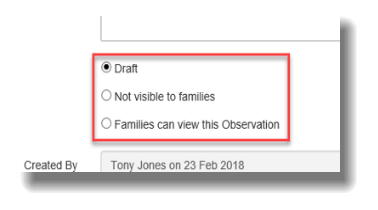
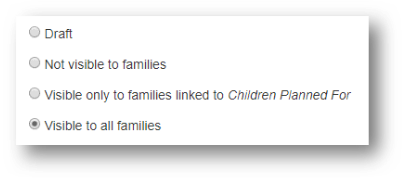
Setting the status of an Experience to Draft or Not visible to families will hide the experience from families.
Educators and administrators can also choose to hide specific experiences from the Program visible to Families not linked to the Children Planned For. This function may be used when children have individual education or behaviour plans in place and it may not be appropriate for all families to view the experiences planned for these children.
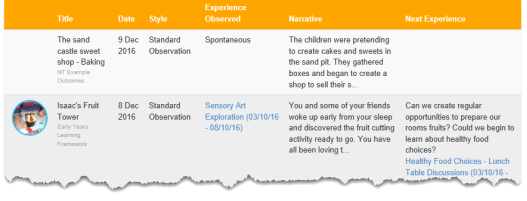
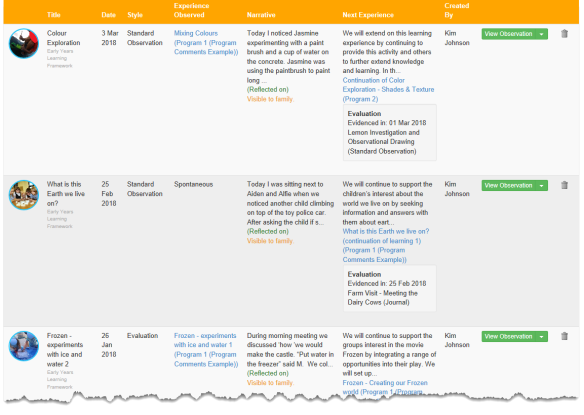
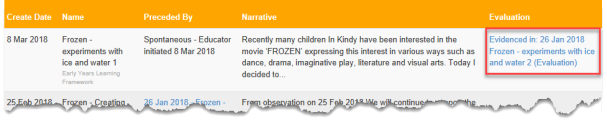
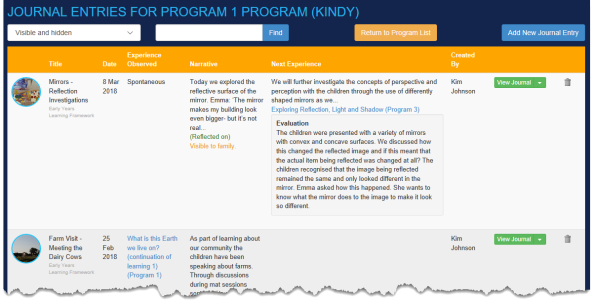
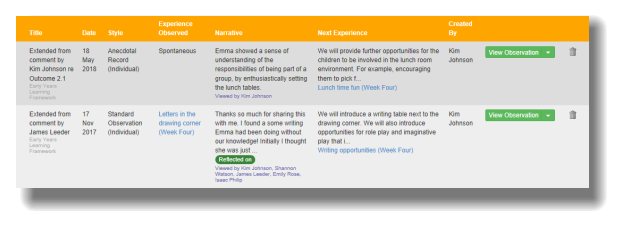
The Observation List and Journal List screens contain links to all experiences planned as extensions of learning observations or journal entries.
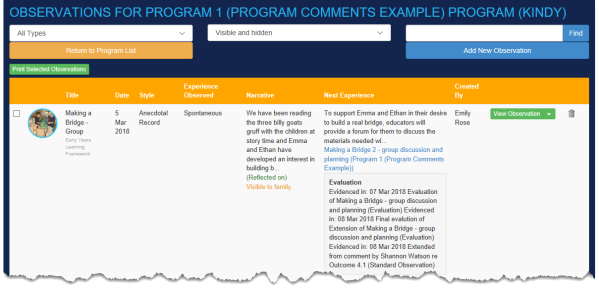
These links help educators use a single experience as the ‘Next Experience’ for multiple observations; e.g. when educators have created different observations of children that ultimately lead to a single planned experience. This is explained in the example below.
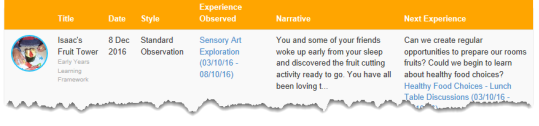
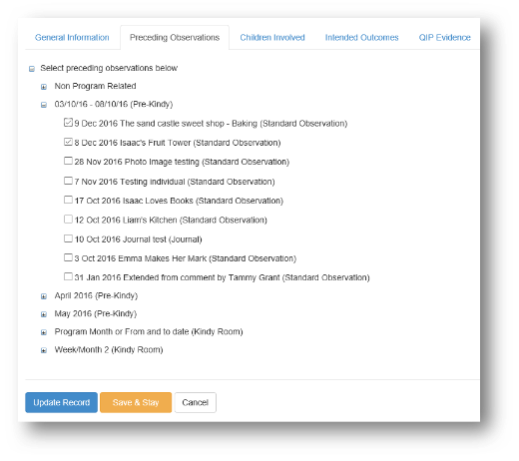
Isaac’s Fruit Tower was the initial observation that led to the experience of ‘Healthy Food Choices – Lunch Table Discussions’. In the same week, another observation was recorded of children baking pretend cakes and sweets in the sandpit; this observation was called ‘The sand castle sweet shop – Baking’. The educator felt that the extension of learning for this observation should be around healthy food choices and discussing healthy eating habits, which is the same as the experience for ‘Isaac’s Fruit Tower’. In this instance, you DO NOT add a written Next Experience when adding the second observation—instead, you add a link in the experience that was planned as a result of the previous observation.
In the example below, you’d click the ‘Healthy Food Choices – Lunch Table Discussions’ link to go to the Edit Experience screen.
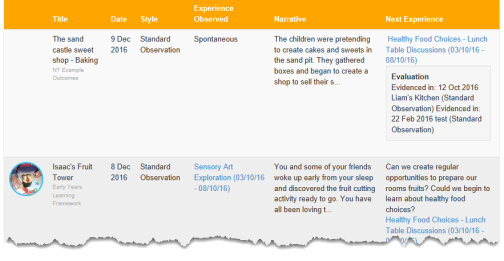
All links display in the viewable and printable observations, thus ensuring that there is a clear and visible cycle of planning.
You can create a viewable/printable program that combines multiple rooms/groups. This helps services implement Primary Caregiving for children, where services combine rooms for programming purposes or where services choose to program for individual children or learning areas.
Each group within a room creates their observations, programs, and journals as normal.

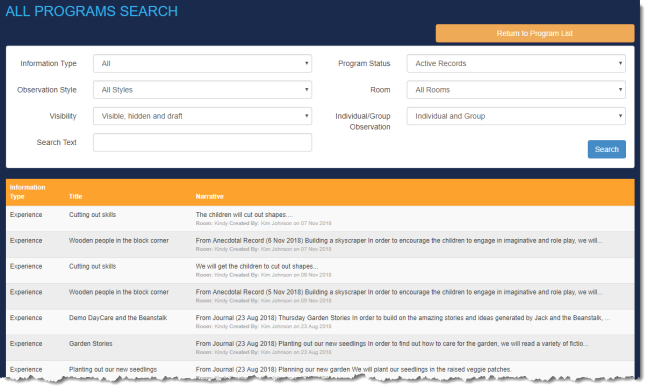
Use the All Programs Search button from the Program List screen to access the new all programs search screen.
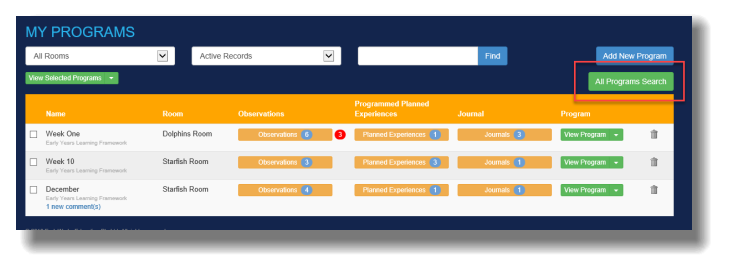 Educators and administrators can search within all Programs for Observations, Experiences and Journals using the search criteria below.
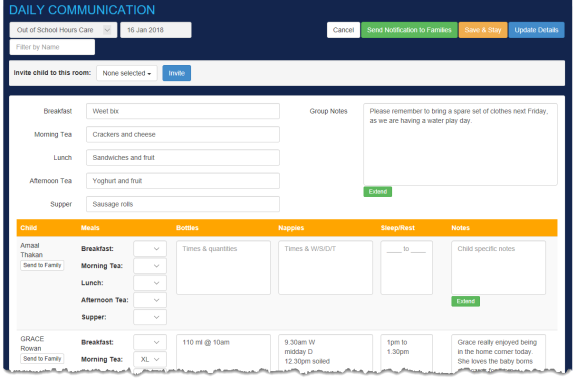
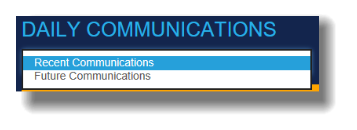
The Daily Communications list allows administrators and educators to view a summary of all educator-to-family communications, including information on meals and group notes. More detailed information such as individual child portion sizes, bottle information, nappy/toileting information, sleep and rest times, as well as any personalised messages can be viewed by clicking on the row of the date that you wish to view.
|
Hints & Tips |
|
|
Hints & Tips |
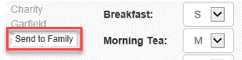
Educators and administrators can also send notifications to individual families once daily communications have been added.
|
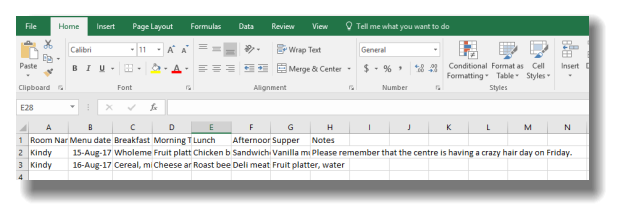
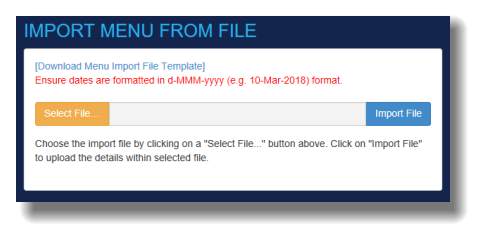
Administrators can upload their service’s food menu in advance to prefill the daily communications food menu information.
To upload the service’s food menu from the Daily Communications screen:
|
Hints & Tips |
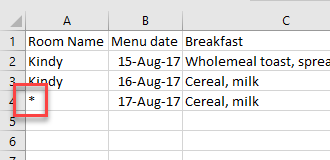
When importing a meal menu into EarlyWorks, educators and administrators can now enter an asterisk (*) into the Room Name column if the Menu Item applies to all rooms.
|
EarlyWorks has been designed to support educators in following the EYLF planning cycle. The step-by-step processes for adding observations, programmed experiences, etc. are explained in detail in Programs. In this section, we explain how to monitor this information and how to check that the planning cycle is visible and evidenced through documentation. It is an ACECQA requirement that services have a visible planning cycle for rooms and for individual children.
To see the planning cycle for an individual child:
Learning journey comments record a child’s current knowledge and abilities in relation to the learning outcomes set by the service. To prompt educators to regularly add to these comments, they are displayed on the Child Alerts list (see Child Alerts).
When you add comments to the child’s learning journey, EarlyWorks adds them to the child’s Learning Journey document. This document groups comments by outcome and date, thus showing a child’s learning journey over time.
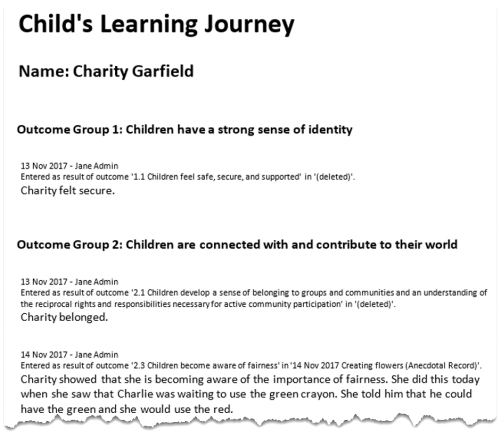
Comments should be a professional analysis of the child’s current abilities/knowledge and goals in relation to the selected learning outcome. When educators view the observation, they can see the learning journey comments for each child. Families will only see the comments for their child, and only if they were granted permission to see the comment.
You can use learning journey comments to inform program planning. These comments help show how the child’s current knowledge and abilities are incorporated in the design and planning of the program, and how each child’s learning and development needs drive curriculum decisions. You can also add comments to a child’s record that relate to the child’s current knowledge, ideas, culture, abilities, and interests. These comments can be converted into observations. (NQS Element 1.1.2)
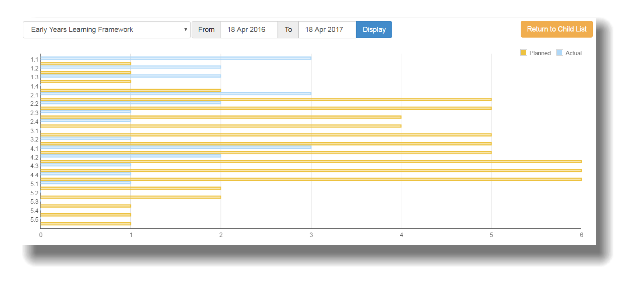
You can view and compare a child’s planned and actual observed learning outcomes. This helps you monitor your planning in relation to the learning outcomes for an individual child.
Outcome numbers are listed on the y-axis; numbers of observations are listed on the x-axis; planned outcomes are shown in orange; and actual outcomes are shown in blue.
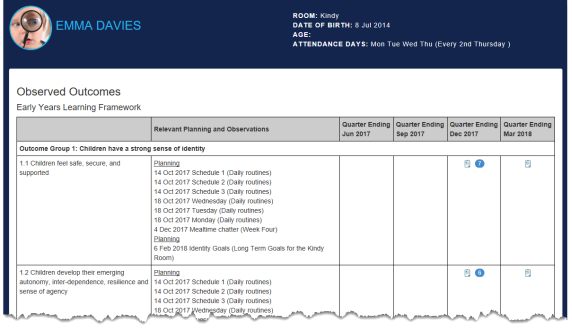
A child’s profile is an automatically generated document that details exactly how and when each learning outcome was observed for a specific child. This information is divided by calendar-year quarters, with totals for the number of times each learning outcome was observed for the child. Use this information to reflect on your planning and provide evidence that you are supporting each child’s strengths as well as those areas needing further development.
A child’s profile also includes evidence of planning for each learning outcome. Learning outcomes are tallied in the same way as observed outcomes. These contribute to your planning and assessment of learning for the child.
Using the child’s profile, you can see the planned outcomes, as well as the program this planning was included in. This helps you show how curriculum decision-making contributes to each child’s learning and development opportunities (NQS Element 1.1.1). Make sure your planning emphasises how this decision-making maximises each child’s learning and development to assist in reflecting exceeding practices.
|
Hints & Tips |
To help services provide evidence that documentation about each child’s program and progress is available in an accessible format and that opportunities are provided for discussion with families (NQS Element 1.3.3), services can produce and provide the child’s profile and learning journey to families. This is done by selecting the print option for either document. Make sure you review this document thoroughly before making it available to families—ALL comments are included in the child’s profile. |
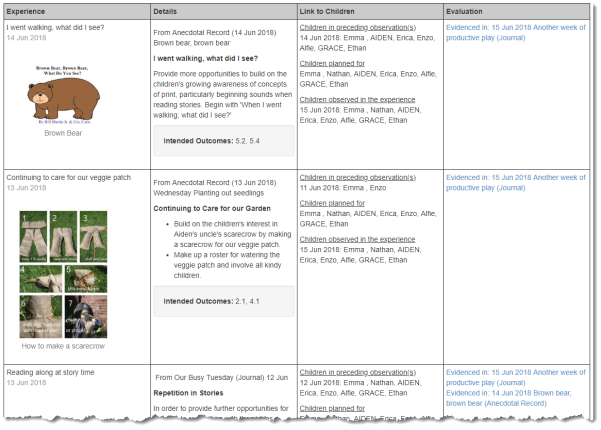
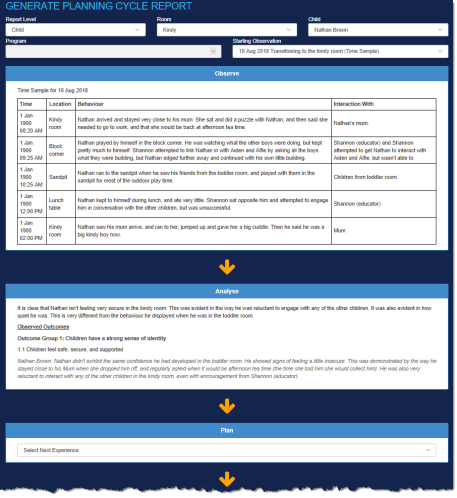
This report is generated dynamically, giving the educator the ability to trace any given path within a cycle, no matter how complex. This provides a great diagnostic tool for room leaders wanting to ensure their educators are creating visible planning cycles within their documentation. The feature can also be used during the rating and assessment process to provide planning cycle evidence and assist educators to confidently talk through any number of planning cycles for any number of Children in any Room.
The feature is available via the Admin > Generate Planning Cycle Report menu option.
To generate the report, administrators and educators enter selection criteria based on either a Child or Room cycle. Once a Starting Observation has been selected the planning cycle will start to display. Use the Next Experience and Observation dropdown lists within the steps generated to continue generation of the report based on a selected path within the cycle. You can print the generated cycle as a Word document at any time using the Print the steps displayed button.
Users can view a list of notifications generated from EarlyWorks.
For Administrators and Educators this function is available from the Admin > Quick Notification menu option. Families will be able to access this feed from the main menu.
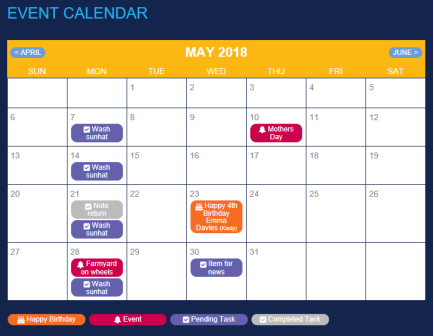
Users can view an Event Calendar from the Admin > Event Calendar menu option. The Event Calendar displays children’s birthdays, upcoming events, pending tasks and completed tasks. All login types (Administrators, Team Leaders, Educator Assistants and Families) have their own Event Calendar. Only Administrators and Team Leaders can add tasks or events to the Event Calendar. Children’s birthdays are included automatically. While Families will only see their own child’s birthday, Team Leaders and Educator Assistants will see the birthdays of all children from their rooms.
Administrators can choose to display Experiences in the Event Calendar. Experiences can be hidden, visible to educators only or visible to both educators and families. This option is available to administrators via the Maintain > Settings menu option.

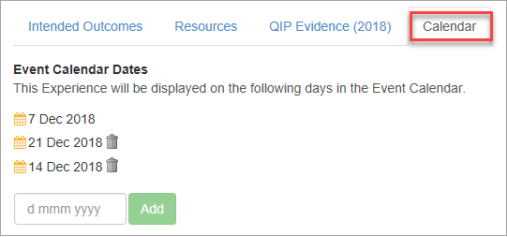
Where an experience is repeated on several days, educators can add these additional dates to the calendar using the Calendar tab on the Experience Edit screen.
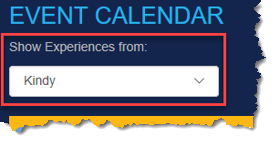
Educators can choose which Room Experiences they want visible in the Event Calendar. They can also choose not to display any Experiences.
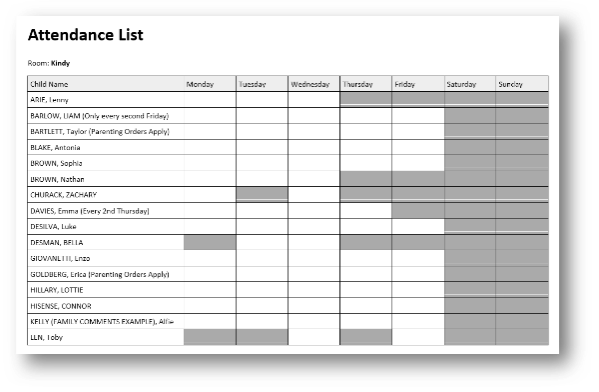
You can print a list of children showing their booked attendance days for the week, without having to access your service’s child care management system. Note: This list reflects the days checked on the child’s profile, NOT actual attendance; it does not account for expected half-day or ad hoc attendances. Grey cells mean the child does not attend on that day.
You can view the learning outcomes for a room, or add information that’s common to a room—such as group photos, supervision plans, documents related to the room, etc. Only administrators can add a room.
In EarlyWorks, a ‘room’ can be a physical room, or it can be a group you’ve created to which you can apply the same programs etc.
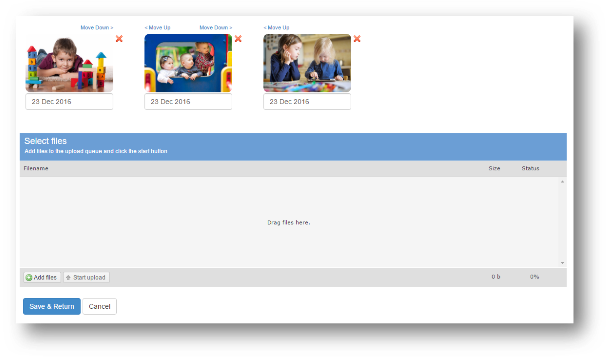
You can add group photos, documents, etc. to a room. Each document can have one or more children associated (‘tagged’) with it—or none. Documents may include notices to families, special event images, before and after photos of environment changes, etc.
CAUTION: If you link (tag) a child to an image, you make that image available to that child’s family via their image gallery. Permission may be required from the parents/guardians of other children in these images.
|
Hints & Tips |
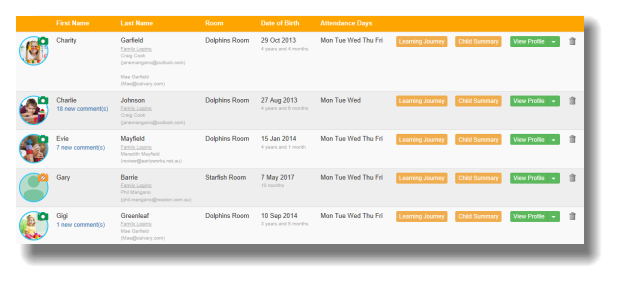
Icons on the Child List screen provide information about photo permission
Where a child has medical notes recorded under Child Details, an ambulance |
These documents could include photos, scanned copies of the child’s work, or other documents related to the child. Families do not see these files.
|
Hints & Tips |
|
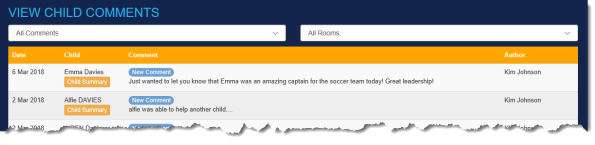
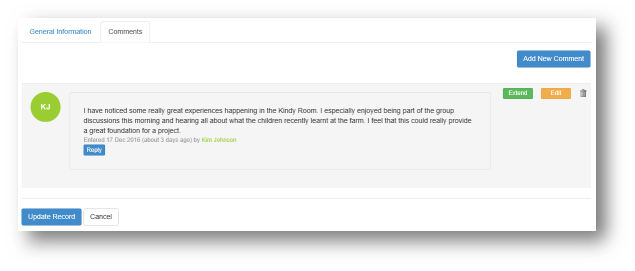
Any educator or administrator can add comments to any child. Family members can only add comments for their child/children.
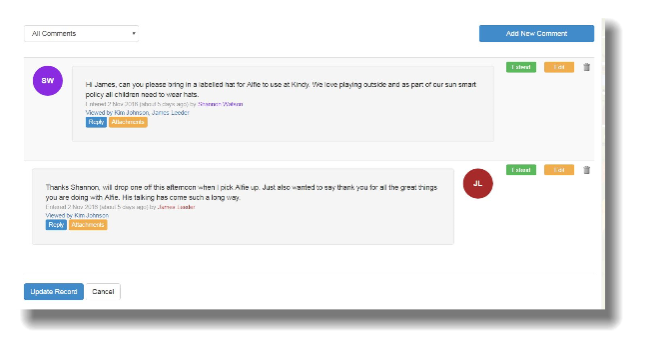
Families and educators can reply directly to an individual comment. You can view child comments from the dashboard (where the five most recent comments are displayed), the Child Summary screen (from step 4 below), or using the Child menu option (steps below).

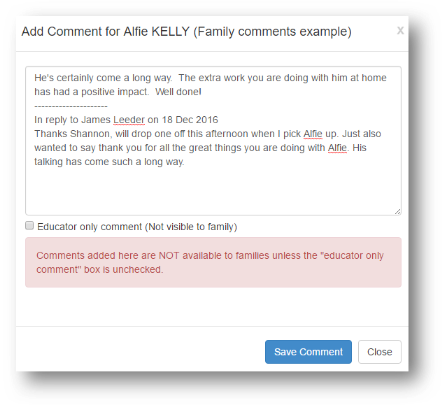
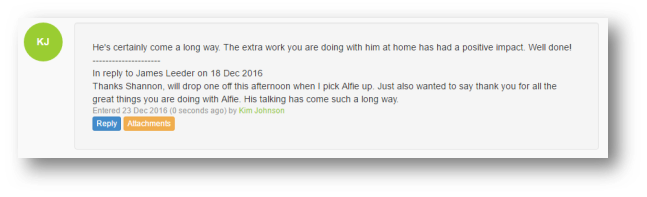
Files—such as documents, forms, and photos—can be attached to a comment. Photos allow you to share a child’s special moments with their family. If you choose to ‘extend’ a comment that has attached files, these files will automatically be included in the observation.
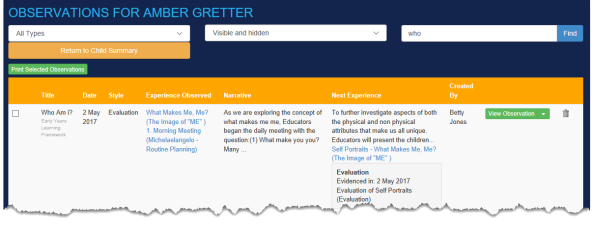
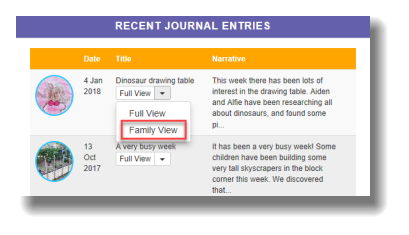
Administrators and Educators can view an individual child’s journal and observation records in the same way that a family member will see it.
Educators can create and save Incident, Injury, Illness and Trauma report forms (Incident Reports) using EarlyWorks. These online forms allow educators to record the details of the incident and then send the form to a specific parent or guardian for signing.
Following an incident, injury or illness, the educator can create a new online form from the Child Edit screen. To access the Child Edit screen, click on the Children tab in the menu bar, and then click on the child’s name.
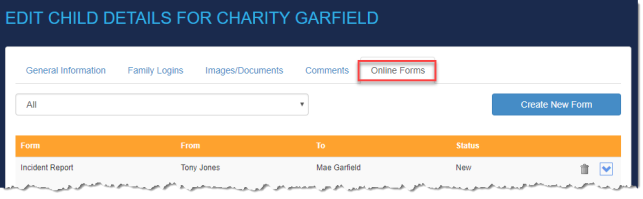
To access the forms, click on the Online Forms tab. A list of online forms that have previously been created for the child will then be displayed. To start a new form, click Create New Form.
Select ‘Incident Report’ from the Template dropdown.
A Family Login will also need to be selected. A child must have an associated family login in order to create an Incident Report.
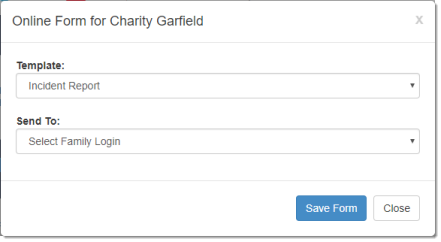
Then click Save Form.
The form will then be generated and the user can enter all relevant information. An Administrator, Room Leader or Educator Assistant login will be able to complete:
The Details of the person completing this record and Incident details sections require the educator to provide a signature.
On a phone, tablet or other touch-screen device, the user can enter their signature with a finger or stylus. On a computer the signature can be added using a mouse.
To change the signature, click the Reset Signature button.
Similarly, the Nature of injury/illness/trauma section gives educators the option to indicate on a diagram, the body parts of the child that have been affected.
The diagram can be marked using a finger, stylus or a mouse. If an error is made press the Reset Markings button to re-enter the marking.
An administrator, room leader or educator assistant will not be able to edit or add to the Parent/guardian acknowledgement or the Parent/guardian notes.
Once all relevant fields have been completed, the user can save the form as a draft by clicking the Save as Draft button at the bottom of the screen. Click the Save and Stay button to save the document and continue working on it.
Selecting either of these options will save the form in the child’s record; however, it will not be visible to the chosen family login.
To send the form to the chosen family login, press the Send button. Once the form has been sent the family member will receive a push notification and/or email notifying them that an Incident report has been created for their child. They will be prompted to complete and sign the parent/guardian sections.
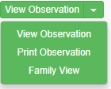
Families can also access the form via View > Online Forms.
By clicking the Cancel button the form will remain in the child’s form list with the status: New. However, any information entered into the form will not be saved.
Once the form has been created it can be accessed via the Child Edit screen or via Admin > Online Forms.
Forms will be saved as either:
To edit an existing form, it must have new or draft status.
A form with sent, opened, or saved status can be reverted to draft via Children >Edit Child screen and selecting the Online Forms tab. Select the form and press the Save as Draft button at the bottom of the screen to revert to draft.
The educator will then be able to make changes to the form.
The family login can also be changed using the dropdown field in the right –hand corner of the screen.
To send the updated form to the chosen family login, press the Send button. Once the form has been sent the family member will receive a push notification and/or email notifying them that an Incident report has been created for their child. They will be prompted to complete and sign the parent/guardian sections.
Once the form has been finished by the educator/administrator, ensure that the correct family member login has been selected from the dropdown field at the top of the page. Then scroll to the end of the form and click Send.
The parent/guardian will receive a push notification and/or an email alerting them that an Incident form has been created for their child.
The parent/guardian can access the form by clicking on the link in the email or selecting the push notification. Here they can review the information from the educator, add their own comments and sign the form.
Once the parent/guardian has marked the form as completed, the user that sent the form will receive a notification in the Notification Feed.
The status of the form can be monitored from Admin > Online Forms.
Services can opt to require Administrator approval before a form is sent to families.
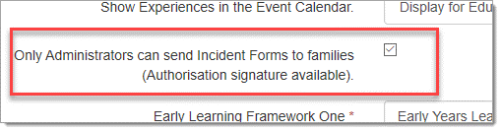
To change this setting, an Administrator will go to Maintain > Settings.
Within the General Settings tab scroll down and check the tick box ‘Only Administrators can send Incident Forms to families (Authorisation signature available).’
Team Leaders and Educator Assistants will still be able to create Incident Forms, however, they will not be able to edit the ‘Manager/Administrator Authorisation’ section. When Team Leaders and Educator Assistants click the Submit button, a notification will be sent to all Administrators, notifying them that an Incident Report has been created and is currently Awaiting Authorisation.
Once a Team Leader or Educator Assistant has submitted the form, they will no longer be able to edit it.
Administrators will be able to make changes to the form and complete the ‘Manager/Administrator Authorisation’ section. If further input is required from the Educator, the Administrator can click the Save as Draft button to revert the form to draft status. This will allow a Team Leader or Educator Assistant to make further changes. They will need to Submit the form again for Authorisation in order for the form to be sent to families.
Click the Save and Stay button to save the document and continue working on it.
To send the form to families, an Administrator will click on the form from the Child Edit screen or via Admin > Online Forms. The Administrator will be able to edit the ‘Manager/Administrator Authorisation’ section then click the Send button to send the form to the chosen family login.
Once the parent/guardian has completed the form, the educator is able to review the form but is unable to make any changes.
To file the form, scroll to the end of the form screen and press the File button.
An administrator or the educator who created the form can delete the form at any time. To do this, access the forms list via Admin > Online Forms and selecting the trash can icon. A prompt will appear confirming that you would like to delete the form.
Deleted forms are not removed from the system and can be accessed via Admin > Online Forms then using the drop-down menu at the top of the screen, select Deleted.
This will show a log of all deleted forms.
A deleted form can be reverted to draft status by selecting the form, a clicking the Save as Draft button at the bottom of the form screen.
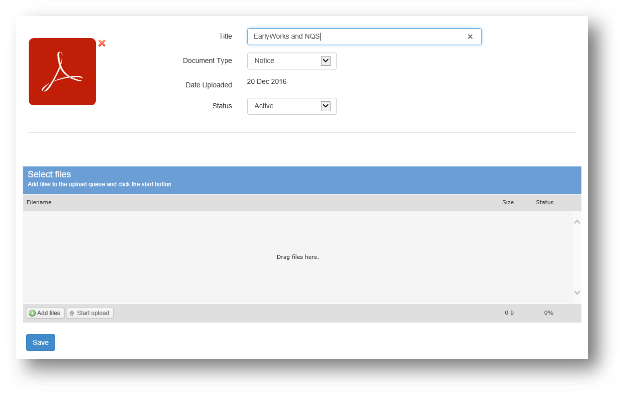
Administrators and educators can upload important documents such as parent handbooks, policies, notices (such as newsletters or event flyers), and forms (such as medication and permission slips), etc.
You can upload documents for ALL families, for individual children or rooms, or those related to observations. The maximum document size is 8 Mb. See File Types and Sizes for information on which file types EarlyWorks accepts.
To upload one or more documents for ALL families:
See also:
Your service’s written Quality Improvement Plan (QIP) is developed from administrator and educator QIP notes in EarlyWorks. Evidence to support your service’s QIP can be generated automatically through reflections of pedagogy, observations, program planning, and comments.
The QIP is a ‘living’ document so you don’t need to add all the information at once—you can add to and edit this information at any time by returning to the QIP Strengths or QIP Improvements screens.
|
Hints & Tips |
|
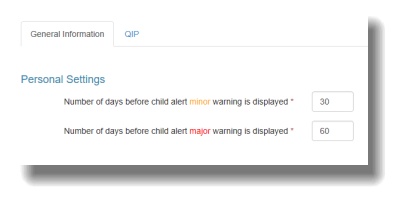
On the Update Settings screen (Maintain> Settings), you can set the number of days before a minor or major child alert displays (see Set the Frequency of Child Alerts).
Educators can select a Room as their Default Room when using EarlyWorks. This option is available via the Maintain > Settings menu option.
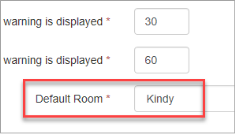
When this option is used, screens like the Program List screen and Child Alerts screen will display programs for that Room by default.
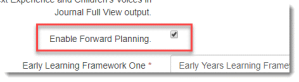
EarlyWorks includes an optional Forward Planning feature. For many services where forward planning forms part of the weekly process, this will provide for additional planning prior to intentional teaching. This feature, when enabled, is available to all administrators and educators.
To enable this feature, an EarlyWorks Administrator will need to access the Maintain > Settings menu option and check the Enable Forward Planning checkbox.
When this option is selected, a Forward Planning button will appear for each Program on the Program List screen.
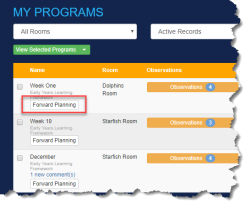
Clicking on the Forward Planning button will display the Forward Planning List screen.
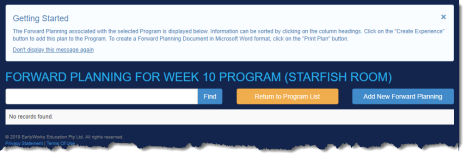
To add new Forward Planning information, click on the Add New Forward Planning button. The following detail screen will be displayed.
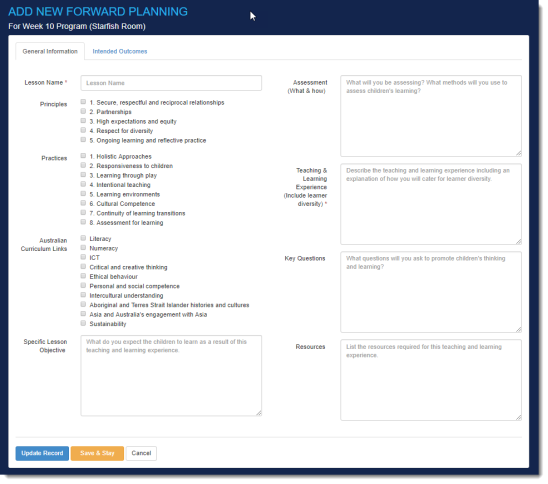
This screen allows administrators and educators to record information such as Principles, Practices, Outcomes (on the Intended outcomes tab), Australian Curriculum Links, Specific Lesson Objectives, Assessment (what & how), Teaching & Learning Experiences (including learner diversity), Key Questions as well as any Resources Required.
By default, the Australian Curriculum links are based on the combination of seven General Capabilities and three Cross-curriculum priorities.

Should you wish to change these selections, please contact EarlyWorks support at support@earlyworks.net.au detailing your specific selections.
The Update Record button will save the forward planning information and return you to the Forward Planning list screen.
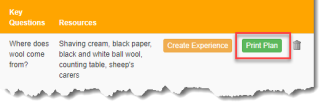
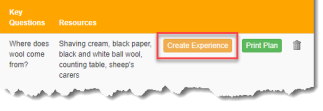
From the list, you can edit existing forward planning information, by clicking on the relevant row or printing the information in Microsoft Word format using the Print Plan button.
Once formalised, a plan can be automatically introduced into the EarlyWorks Planning Cycle by clicking on the Create Experience button on the relevant row. This will generate a new Experience into the Planning Cycle. Narrative and Outcome information will be transferred to the new experience record.
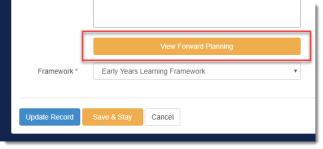
You can now update the new experience record if required. You can refer back to the originating forward planning information by clicking on the View Forward Planning button.
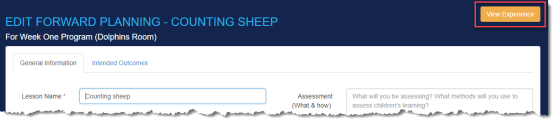
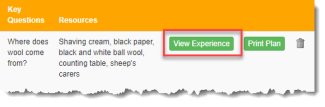
Once an experience has been created from a forward plan, you can view the generated experience from the View Experience button on the Forward Planning list screen or the from the Edit Forward Planning screen.
When you first log in to your EarlyWorks account you are asked to enter aspects of your service information using the Setup Checklist.
|
Hints & Tips |
|
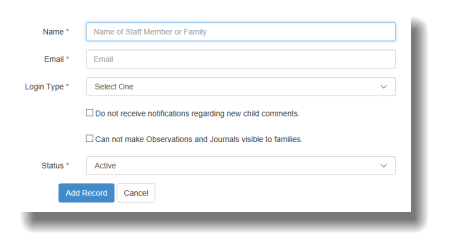
Note: Use these steps to add staff one at a time. Follow the steps for Import Staff to add bulk staff records.
|
Hints & Tips |
Use Maintain > Logins to:
|
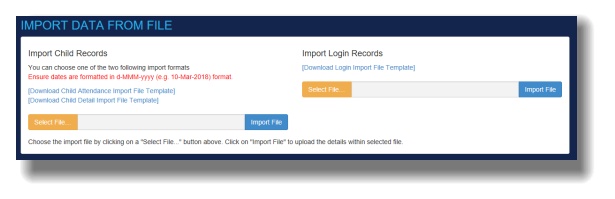
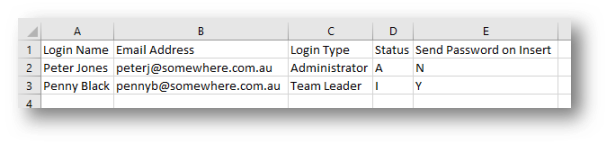
Note: Use these steps for adding multiple staff records from a data file. Follow the steps for Add Individual Staff to add staff records one at a time.
|
Hints & Tips |
Use Maintain > File Data Import to import multiple staff at a later date. |
Note: Use these steps to add children one at a time. Follow the steps for Import Children to add multiple child records.
Note: Use these steps for adding multiple child records from a data file. Follow the steps for Add a Child (in the Educator’s Guide) to add child records one at a time.
|
Hints & Tips |
Use Maintain > File Data Import to import multiple children at a later date. Send Family Password on Insert: Enter Y to automatically email login and password information to the family contact email address, or N if you do not wish to send this information at this stage. See Send a New Password and Issue Bulk Passwords for information and instructions on sending a password later. |
|
Hints & Tips |
Use Maintain > Task Schedules to add or edit scheduled tasks at a later date. |
|
Hints & Tips |
Use Maintain > QIP Notes to add or edit QIP notes at a later date. |
|
Hints & Tips |
Use Programs to add, edit, or delete programs at a later date. |
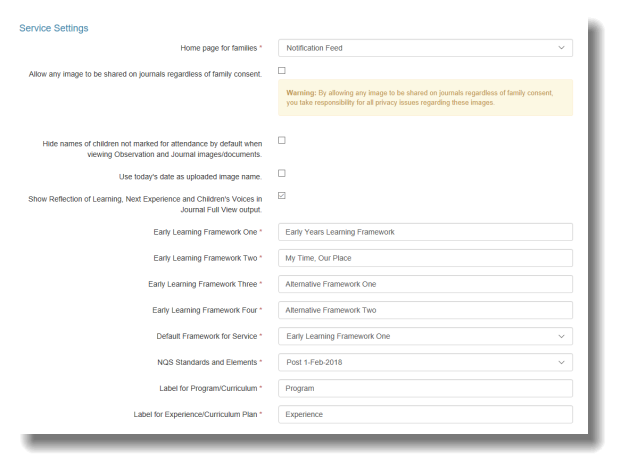
Administrators can select which screen they would like families to have as their home page.
EarlyWorks uses colour-coded child alerts (minor and major) to notify educators and administrators (through their respective dashboards) when a child is overdue to be:
These alerts help services meet their requirements for documentation, as outlined in QA 1 of the NQS, in regulations 73 to 76 of the Education and Care Services National Regulations, and in section 168 of the Education and Care Services National Law.
To set the alert frequency:
By default, EarlyWorks does not allow images of children to be shared outside the child’s family without written consent.
If your service has obtained written permission for every child for all images in the journal to be shared, this security can be removed from the journal ONLY:
|
Hints & Tips |
CAUTION: ALL parents/guardians for ALL children in the room must give their consent. If only one parent/guardian refuses, then NO images can be shared. Collecting, verifying, and collating these permissions is not a function of EarlyWorks—services must ensure they have followed all privacy laws and obtained all necessary written permissions before they consider selecting this checkbox. If you are in any doubt, DO NOT select it. |
When you add documents (including images) and need to select the children who were part of an observation- or journal-related document, EarlyWorks lists the names of those marked for attendance that day in bold at the top of the selection list to simplify the selection process. You can still select children who were not marked for attendance that day—they are listed after those in bold—unless you change this setting.
To hide the names children not marked for attendance:
When you upload an image or any other document, the default title in EarlyWorks is the existing file name (for images, this might be a meaningless system-generated code). You can change an image’s file name when you upload it by manually editing the caption in the textbox, or you can change the default caption name for all images to the date uploaded. Note: This setting only applies to image files, not other documents. (See also: File Types and Sizes.)
|
Without date as default caption |
With date as default caption |
To change the default caption name of an image to the date uploaded:
By default, Reflections of Learning, Next Experience, and Children’s Voices are NOT printed in the Journal.
To include these in the Journal output:
EarlyWorks comes preloaded with the Early Years Learning Framework (EYLF) (the default for all programs) and the My Time, Our Place – Framework for School Age Care. Other learning frameworks can be added to EarlyWorks upon request (admin@earlyworks.net.au).
Alternatively, services can add their own framework:
You can select which learning framework appears at the top of the selection list when choosing a Framework for a Program, Experience, Observation or Journal.
For example, if you provide Outside of School Hours care you may want the “My Time, Our Place” learning framework to appear as the default framework for Programs, Experiences, Observations and Journal. Likewise, if your service is a Kindergarten, you may want your state’s Kindy Curriculum framework to appear as default.
EYLF uses the term ‘curriculum’ to cover ‘all the interactions, experiences, activities, routines and events, planned and unplanned, that occur in an environment designed to foster children’s learning and development’ (p. 9). The My Time, Our Place – Framework for School Age Care uses the same definition to describe ‘program’ (p. 6)
Similarly, some frameworks use ‘Experience’ while others use ‘Curriculum Plan’ to mean the same thing.
EarlyWorks uses the word ‘Program’ and ‘Experience’ by default; however, you can change these words to suit your service’s requirements. To change the words on the relevant labels in EarlyWorks:
The administrator dashboard summarises the service’s programming documentation and reflections requiring feedback for the current calendar month.
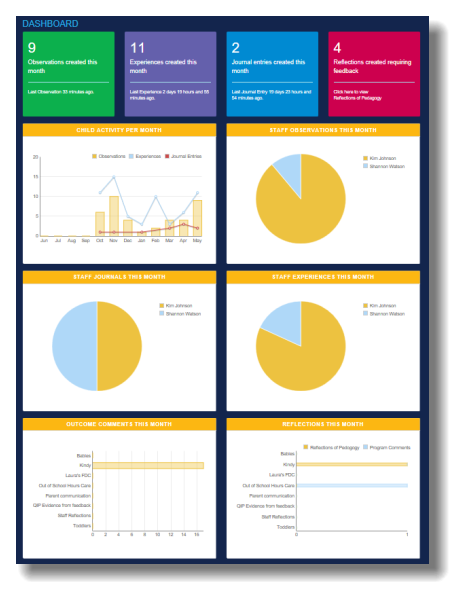
Elements displayed on the dashboard:
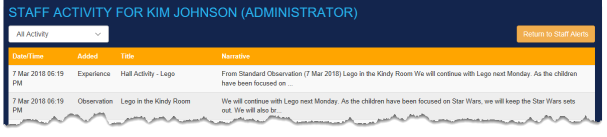
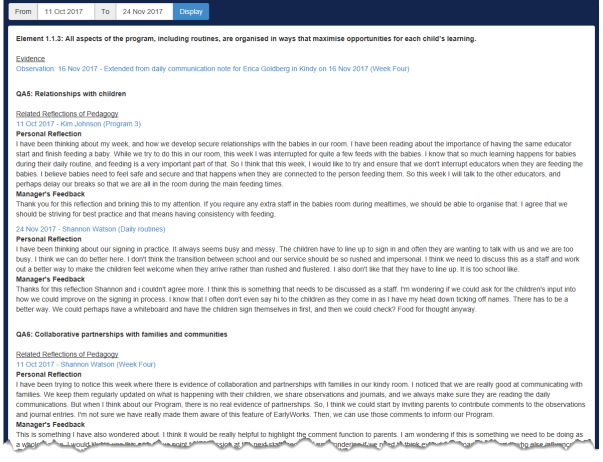
You can view a summary of all educators’ contributions (observations, experiences, journal entries and reflections of pedagogy) to the service’s documentation made within a date range, as well as details of individual educator contributions. This information can help you identify an individual educator’s training and development requirements, as well as contribute to performance appraisals for each educator.
See Child Alerts in the Educator’s Guide section for more information and instructions.
See Booked Attendance List in the Educator’s Guide section for more information and instructions.
See Daily Communications in the Educator’s Guide section for more information and instructions.
Administrators can view all recent comments added to any child’s record (Admin > View Child Comments). Comments act as a news feed so that you are informed of all notes relating to the children in your service.
See View Child Comments in the Educator’s Guide section for more information and instructions.
Tasks and reminders help ensure that all compliance tasks (regular or one-off) are completed on time.
Using Admin > View Tasks, you can view:
See Tasks in the Educator’s Guide section for more information and instructions.
Maintain Events appear in the Event Calendar using Admin > View Events menu option.
See Maintain Events in the Educator’s Guide section for more information and instructions.
Reflections of Pedagogy can be linked to the service’s QIP to help support any of the Quality Areas relevant to the content of the reflection. By providing feedback on these reflections, administrators can show they are contributing to the overall development of the service’s curriculum (NQS – QA 1), working collaboratively to affirm, challenge, support, and learn from and with their educators (NQS – QA 4, Standard 4.2), and promoting an embedded culture of ongoing continuous improvement (NQS – QA 7).
Administrators can view all reflections of pedagogy (Admin > Reflections of Pedagogy). See Reflections of Pedagogy in the Educator’s Guide section for more information and instructions.
On the Edit Reflection of Pedagogy screen, enter your feedback into the Manager’s Feedback textbox. You can also Include this reflection in the QIP Evidence List by selecting that checkbox. If you select this option, then the detail will be added to the QIP Evidence List as follows:
See Generate the Quality Improvement Plan.
See QIP Evidence List.
This function is available from the Admin > Notification menu option.
Educator and family logins are added the same way (see Add Individual Staff and Import Staff for adding educator logins). There is no limit to the number of family members who can log in to EarlyWorks, so grandparents, aunts, uncles, and other close family can be added at the request of a parent or guardian. External support agencies can also be added at the family’s request.
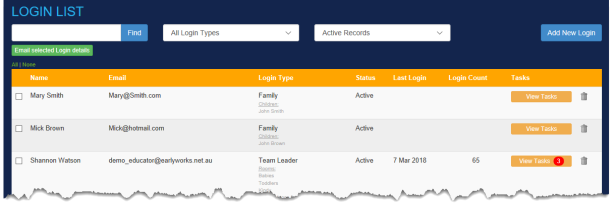
You can add multiple family logins using the import function (Maintain > File Data Import). See Import Staff for steps.
If a family member forgets their password, you can generate a new one for them. When they next log in, they use the new password, and then must immediately change it to a password of their own choosing. The password they choose cannot be the same as an earlier password they used in EarlyWorks. (See About Passwords for acceptable password formats.)
EarlyWorks does not keep any record of current passwords. Lost or forgotten passwords must be replaced using the method below or Issue Bulk Passwords.
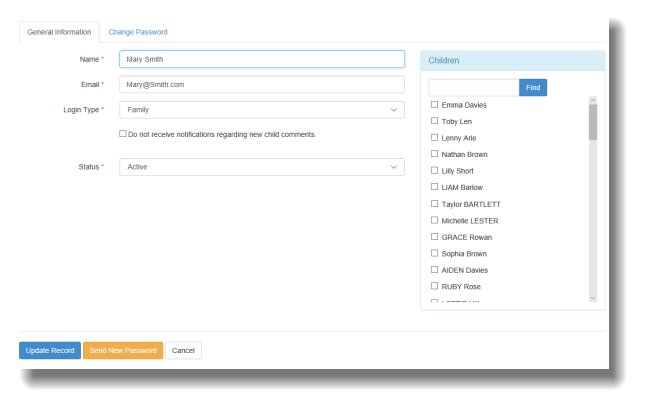
You can set the passwords for any of your staff or families. From the Edit Login screen, click on the new “Change Password” tab to display the following.
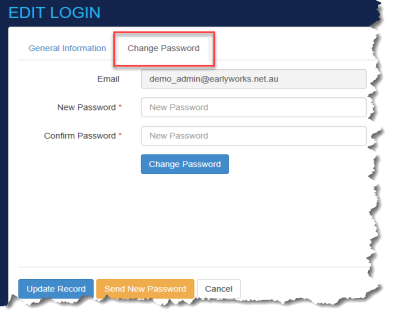
Enter a New Password (and confirm) and click on the Change Password button to update the educator’s or family’s password. The educator or family can now use this new password to access EarlyWorks. Note that they will be prompted to change this password when next accessing EarlyWorks.
You may be wondering how best to handle the situation where children are leaving your service but families still wish to have access to their child’s information on EarlyWorks.
There are three options available to you:
Option 1: This option will allow families to keep an active login so that they can view their inactive child’s information. This would be used if the child is leaving the service, and you would like to allow the family continued access to the child’s information.
Option 2: This option only allows families to view information about their children with active records. This would be used if the family has at least one child with an inactive record and one child with an active record, and you only want them to view the active child’s information.
Option 3: This option will prevent families from having access to EarlyWorks. This would be used if the family no longer has any active children at the service, and you do not wish them to have access to their inactive children’s records.
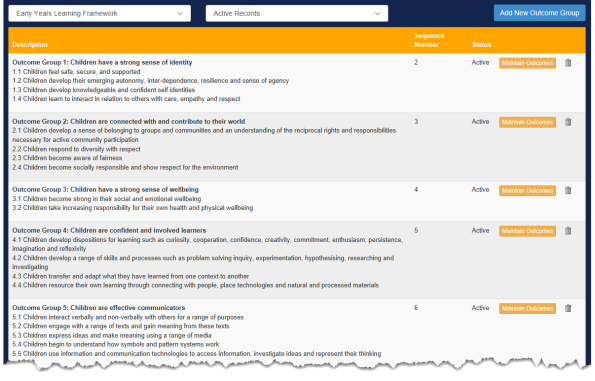
EarlyWorks comes preloaded with learning outcomes for EYLF and My Time, Our Place – Framework for School Age Care. On request (admin@earlyworks.net.au), EarlyWorks can include other learning frameworks (e.g. Kindergarten Curriculum Guidelines, Montessori Curriculum, Te Whāriki). Services can also personalise the outcomes available to include additional items such as their service philosophy, theorists, and any other areas that are referenced through their program.
|
Hints & Tips |
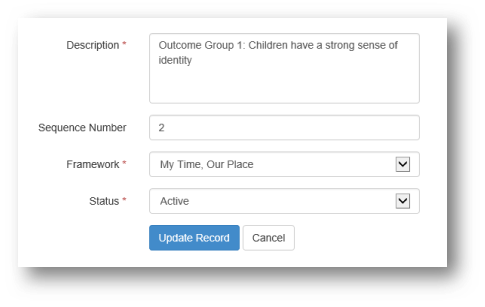
Sequence numbers: We suggest you add sequence numbers such as 10, 20, 30, etc. instead of 1, 2, 3, etc. Why? If you later need to slot a new outcome group in between others, you’ll have a range of available numbers to choose from to maintain the sequence. Otherwise, you may have to renumber all the later outcome groups to reflect their new position in the sequence. For example, if you used 1, 2 ,3 ,4, and 5, then needed to add an outcome group between 1 and 2, you’d have to renumber 2, 3, 4, and 5, incrementing them by 1. But if you used 10, 20, 30, etc. then to add an outcome group between 10 and 20, would mean adding a number such as 13—it would slot into the sequence and you wouldn’t have to renumber all the other outcome groups. |

|
Hints & Tips |
Sequence numbers: See the Hints & Tips for Add an Outcome Group. |
Administrators and Room Leaders can set reminders for educators’ regular compliance requirements such as Working with Children checks, First Aid Certificate renewals or evacuation drills. Tasks can also be allocated to a family member for items such as providing copies of birth certificates and current immunisation records.
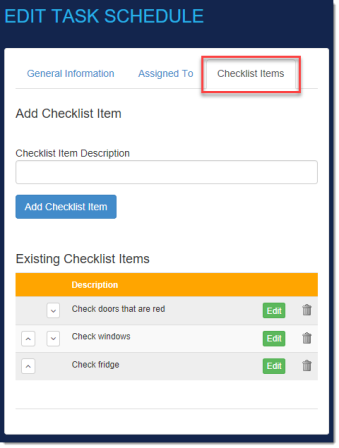
Checklists can be added to tasks. To create a checklist, use the Checklist tab from the Task Schedule screen.
Administrators and Room Leaders can add one-off events to the Event Calendar using this function.
See Upload Documents in the Educator’s Guide section for more information and instructions.
Administrators can access information on all rooms within a service. This information includes:
See Rooms in the Educator’s Guide for more information and instructions. See Add Rooms (or Groups for FDC) for information and instructions on how to add a room to the service.
EarlyWorks simplifies the creation of the service’s Quality Improvement Plan (QIP), and helps you ensure this important document is always up-to-date. Educators can contribute their own QIP notes, which can be included in the final QIP at the discretion of the administrator.
Throughout EarlyWorks there are various ways to contribute to the service’s QIP. The combination of these contributions produces a QIP for downloading, printing, and submitting to your regulatory body. The produced QIP is based on the Australian Children’s Education and Care Quality Authority (ACECQA) template, and is in Microsoft Word format.
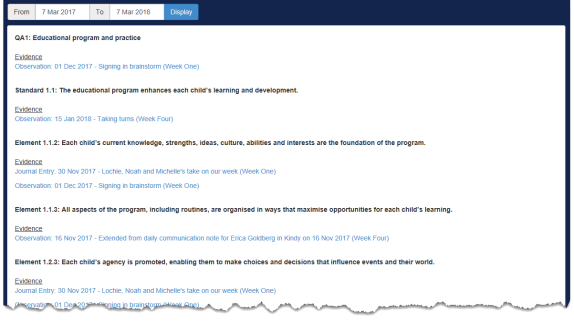
As part of their day-to-day processes, educators and administrators will add links to the NQSs using the QIP Evidence tab in the Observations, Experience, Journal entries, and Reflections of Pedagogy screens. This helps service providers gather evidence as part of the rating and assessment process.
To view the evidence:
See the Educator’s Guide section for more information and instructions:
See the Educator’s Guide section for more information and instructions:
See Child Information in the Educator’s Guide section for more information and instructions:
|
Term |
Definition |
|
ACECQA |
Australian Children’s Education and Care Quality Authority (http://www.acecqa.gov.au/) |
|
Active |
A record that can to be added to, modified, and linked to observations, experiences, and journal entries. |
|
Administrator (as used in EarlyWorks) |
A person in charge of an education and care service with the responsibilities of overseeing centre programming and documentation. |
|
CSV |
Comma-separated value (file format that can be created by and read by Microsoft Excel) |
|
Curriculum |
See Program |
|
Curriculum Plan |
See Programmed Experience |
|
DD MMM YYYY |
Date format; two-number day, three-letter month, four-number year (e.g. 14 Jun 2017, 09 Sep 2018) |
|
Developmental Milestone |
Skills observed in children. EarlyWorks has included the Developmental Milestones from the ‘Early Years Learning Framework Practice Based Resources – Developmental Milestones’ with EYLF outcomes. |
|
Educator Assistant (as used in EarlyWorks) |
An individual who provides education and care for children within an early childhood education and care service who does not hold an Early Childhood Education and Care Diploma. |
|
Educator (as used in EarlyWorks) |
An individual who provides education and care for children within an early childhood education and care service. In EarlyWorks, ‘educators’ can be Room Leaders or Educator Assistants. |
|
Exceeding Practices |
Practices defined as ‘Exceeding Indicators’ in the ACECQA National Quality Standard Assessment and Rating Instrument |
|
Experience |
Experiences may be child-led (from a previous observation), educator-initiated (intentional teaching), or come from family input. Experiences could include:
See also Programmed Experience This Manual uses the word ‘Experience’; your service may have changed this to ‘Curriculum Plan’ in the Settings screen. If so, substitute ‘Curriculum Plan’ wherever ‘Experience’ is used. See Change the Label for Program and/or Experience. |
|
Extend (as used in EarlyWorks) |
Converts the text in a comment box to an observation. This allows educators to create links to the learning frameworks and to plan a next experience from this comment. |
|
EYLF |
Early Years Learning Framework |
|
FDC |
Family Day Care |
|
Framework |
In EarlyWorks, specifically relates to an approved learning framework. |
|
Inactive |
A record that cannot be added to, modified, or linked to observations, experiences and journal entries. Inactive records can only be viewed, not edited. In some parts of EarlyWorks, you cannot delete a record that is linked to other records—if you no longer require that record, change its status to ‘inactive’. |
|
Journal |
Documentation that showcases the experiences and learning that occurred on a particular day. |
|
Journal Entry |
The written description of experiences and learning that occurred on a particular day/week. |
|
Last Experience |
The last time there was a planned extension of learning involving the child. A method to ensure that each child’s learning and development is assessed as part of an ongoing cycle of planning, documenting, and evaluating by ensuring that the written programming and evaluation is ongoing, appropriate, and inclusive of each child. (NQS 1.2) |
|
Last Journal Entry |
The last time the child was part of the daily journal. |
|
Last Learning Journey Entry |
The last time individual comments were made on a child’s record about their abilities and progress in relation to the learning outcomes used by the service. |
|
Last Observation |
The last time this child was observed in either a group or an individual observation |
|
Learning Outcome |
A skill, knowledge, or disposition that educators can actively promote in early childhood settings, in collaboration with children and families. (from: Belonging, Being and Becoming, p48) |
|
NQS |
National Quality Standard |
|
Observation |
A written description of something that was observed. |
|
OSHC |
Outside School Hours Care |
|
Outcome |
See Learning Outcome |
|
Pedagogy |
Early childhood educators’ professional practice, especially those aspects that involve building and nurturing relationships, curriculum decision-making, teaching, and learning. (from: Belonging, Being and Becoming, p48) |
|
Planned Experience |
See Programmed Experience |
|
Planning Cycle |
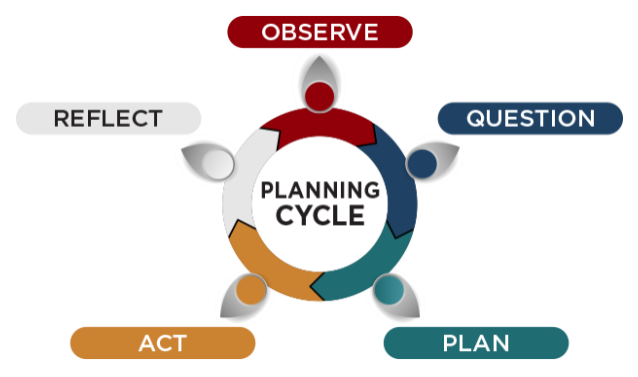
The National Quality Framework requires educators to show evidence of the planning cycle. The planning cycle comprises steps that are recommended to effectively observe, analyse, and evaluate children’s learning and development to make professional decisions in relation to planning. The steps that EarlyWorks refers to when using the term ‘planning cycle’ are:
|
|
Primary Caregiving |
An early childhood education and care approach where specific educators are assigned as the ‘key teacher’ for specific children. In this approach, the focus is on building relationships of trust and security. |
|
Program |
All the interactions, experiences, activities, routines, and events—planned and unplanned—that occur in an environment designed to foster children’s learning and development (from: Early Years Learning Framework, p45; adapted from Te Whāriki) This Manual uses the word ‘Program’; your service may have changed this to ‘Curriculum’ in the Settings screen. If so, substitute ‘Curriculum’ wherever ‘Program’ is used. See Change the Label for Program and/or Experience. |
|
Programmed Experience |
The documented plan for individual interactions, experiences, activities, routines, and events. Also known as a ‘Planned Experience’, ‘experience’ or ‘Curriculum Plan’. This Manual uses the word ‘Experience’; your service may have changed this to ‘Curriculum Plan’ in the Settings screen. If so, substitute ‘Curriculum Plan’ wherever ‘Experience’ is used. See Change the Label for Program and/or Experience. |
|
QA |
Quality Area |
|
QIP |
Quality Improvement Plan |
|
Reflections of Pedagogy |
A written reflection of professional practices. |
|
Room Leader |
An individual who oversees a room/group within the service. |
|
Service |
A long day care, family day care, preschool (kindergarten), or outside school hours care service. |
|
Spontaneous |
Unplanned |
|
Status |
See Active; see Inactive |
|
Team Leader |
See Room Leader |
|
Voice of the Child (as used in EarlyWorks) |
What the child has said or done; captures information for the individual child when an observation or journal has been recorded for a group. |
|
YYYYMMDD |
Variation on ISO 8601 date format; four-number year, two-number month, two-number day (e.g. 20170614, 20180909) |
Australian Children's Education & Care Quality Authority, 2017. Guide to the National Quality Standards. http://files.acecqa.gov.au/files/National-Quality-Framework-Resources-Kit/NQF-Resource-03-Guide-to-NQS.pdf
Australian Children's Education & Care Quality Authority, (nd). National Quality Framework. http://www.acecqa.gov.au/national-quality-framework
Australian Government Department of Education, Employment and Workplace Relations, 2009. Belonging, Being and Becoming: The Early Years Learning Framework for Australia. http://files.acecqa.gov.au/files/National-Quality-Framework-Resources-Kit/belonging_being_and_becoming_the_early_years_learning_framework_for_australia.pdf
Australian Government Department of Education, Employment and Workplace Relations, (nd). Early Years Learning Framework Practice Based Resources – Developmental Milestones. http://files.acecqa.gov.au/files/QualityInformationSheets/QualityArea1/DevelopmentalMilestonesEYLFandNQS.pdf
Australian Government Department of Education, Employment and Workplace Relations, 2011. My Time, Our Place: Framework for School Age Care in Australia. http://files.acecqa.gov.au/files/National-Quality-Framework-Resources-Kit/my_time_our_place_framework_for_school_age_care_in_australia.pdf
Queensland Studies Authority, Queensland Government, 2006. Early years curriculum materials – Reflecting on my teaching practices. http://www.qcaa.qld.edu.au/downloads/p_10/ey_lt_reflect_teaching_prac.pdf